

In-Car Audio Measurements
A test sequence to measure the impulsive distortion, frequency response, and maximum sound pressure level of a vehicle
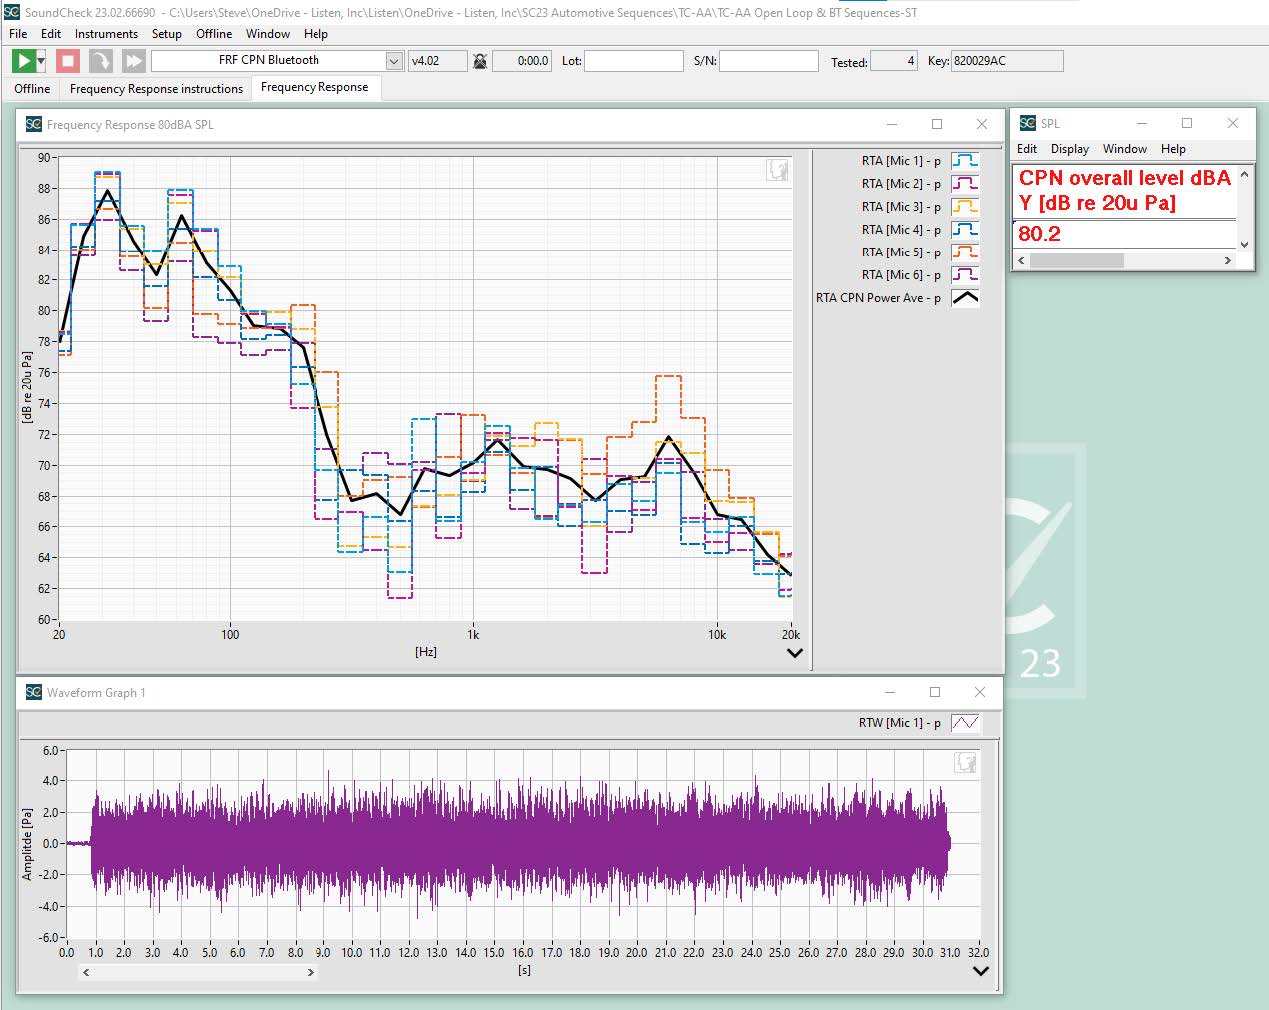
In-car measurement of frequency response with correlated pink noise
Introduction
This sequence tests the impulsive distortion (also known as Buzz, Squeak and Rattle (BSR) or Loose Particles), frequency response, and maximum sound pressure level of a vehicle infotainment system to the methods outlined in the Audio Engineering Society Technical Committee on Automotive Audio (TC-AA) in-vehicle measurements white paper. This white paper aims to define repeatable and defined car audio system measurements and in addition to the measurement methods, contains information on standardized test configuration, for example microphone and seat positioning. Please contact the TC-AA for more information on this project. This test sequence may, of course, be used with your own in-house physical configuration if adherence to the TC-AA guidelines is not essential.
Bluetooth and Open Loop
There are two methods of connecting to the vehicle that are supported with these sequences: Bluetooth and Open Loop. Bluetooth can be used with a Bluetooth interface such as the Portland Tool & Die BQC 4149 that can be connected directly to the infotainment system of the vehicle via SoundCheck. Open Loop can be used when a direct connection with the SoundCheck software is not possible. Wave file test signals are included in the “Open Loop WAV Files” directory. These files can be loaded on to a USB stick and played directly, onto a phone and played via Carplay, or any similar method. Each sequence has either a Bluetooth or an Open Loop version and whichever connection method is used will yield the same results.
If using Bluetooth, the “Bluetooth Pairing to Head Unit” sequence must be run first to connect to the infotainment system of the vehicle. If using Open Loop, load both Wave files from “Open Loop WAV Files” onto your playback device and you will be prompted during sequence run to play the appropriate signal.
Before running any measurements, the sequence “Calibration 80 dBA” must be used to set the appropriate level of the infotainment system for the tests.
Calibration – 80dBA Calibration Sequence Instructions
The sequence calculates the signal level needed for the car infotainment system to output 80dB A-weighted at the mic array. Six meters are run simultaneously in a loop to show the Sensitivity Mean and the user must adjust the level of the car infotainment system until this value is within +/- 1 dB of 80dBA. This configuration must be maintained while the Frequency Response sequence is run.
Sequence Overview
The draft standard uses a six-microphone array placed in the driver’s seat or passenger seat of the vehicle. The center of the array should be placed at the appropriate median head location for the specific vehicle under test. For details on microphone configuration and placement, please refer to the Microphone Array and Positioning section in the Appendix of the white paper (a copy is included in this directory).
There are three measurement sequences:
“Impulsive Distortion”, also known as buzz, squeak, and rattle, or Rub & Buzz. This test measures distortion caused by any rattling components in the car, such as loose molding and trim, incorrectly installed drivers, or components susceptible to vibration. The display step includes the fundamental frequency response, loose particles and recorded time waveform, ePRB measurement, and loose particle envelope.
Frequency Response using the sequence “FRF CPN” (Frequency Response – Correlated Pink Noise). This measures the frequency response of the vehicle’s infotainment system at 80dBA. The display step includes six RTA curves, plus the frequency response curve shown on a graph, with the frequency response SPL value shown in a table.
“SPL Max Volume” measures the maximum sound pressure level that a vehicle’s infotainment system can produce. The display step includes six RTA curves, plus the Max SPL curve shown on a graph, with the Max SPL value shown in a table.
Software Requirements
- SoundCheck Plus Version 23 or later Part #1102
- RTA Analyzer Part #2005
- 8 channel acquisition module Part #2024
Hardware Requirements
- Interface with 6 inputs – Listen AmpConnect 621 or similar Part #4046
- Bluetooth interface – Portland Tool & Die BTC/BQC or similar Part #5816
- 6 SCM Microphones or similar. Part #4012
- 6 Microphone Array*, Part #4016
*Please reference the Microphone Array and Position section of the standard for specific requirements
Software Configuration
At the end of measurement sequence there is a prompt to save data in the default data folder. This can be adjusted in “Edit > Preferences > Folder Paths > Default Dat Path” on a per device basis to make sure all captured data for each unit under test is saved to the same directory.
Your SoundCheck Calibration may not include the Signal Paths used in these sequences. Before opening the sequence for the first time, please take the following steps to import the Signal Paths and associated calibrated device files.
- Go to Setup > Calibration and press the Import button
- Browse to the Calibration folder included in the sequence distribution folder, select either the “Open Loop System.cal” file or the “Bluetooth System.cal” file and click OK
- When prompted to import calibrated device files, select Yes
- When prompted to overwrite existing calibrated device files, select No
Hardware Setup & Calibration
- Connect the microphones to input 1-6 of your audio interface
- Calibrate the microphones as instructed in the SoundCheck manual
- Place the six microphones in the vehicle, adhering to the microphone array and positioning appendix section in the white paper.
- All accessible audio system settings should be set to default or factory reset to neutral or flat. These settings should be documented.
- Depending on your connection method:
- Bluetooth – Connect your Bluetooth device and run the sequence “Bluetooth Pairing to Head Unit”. This sequence is written for a PT&D BQC. If using a BTC, message steps labelled “BQC” will need to be changed to BTC.
- Open Loop – The audio files included in “Open Loop WAV Files” must be copied and able to be played through the infotainment system. For example, placed on a USB device.
You are ready to start the sequence.
Bluetooth System Diagram
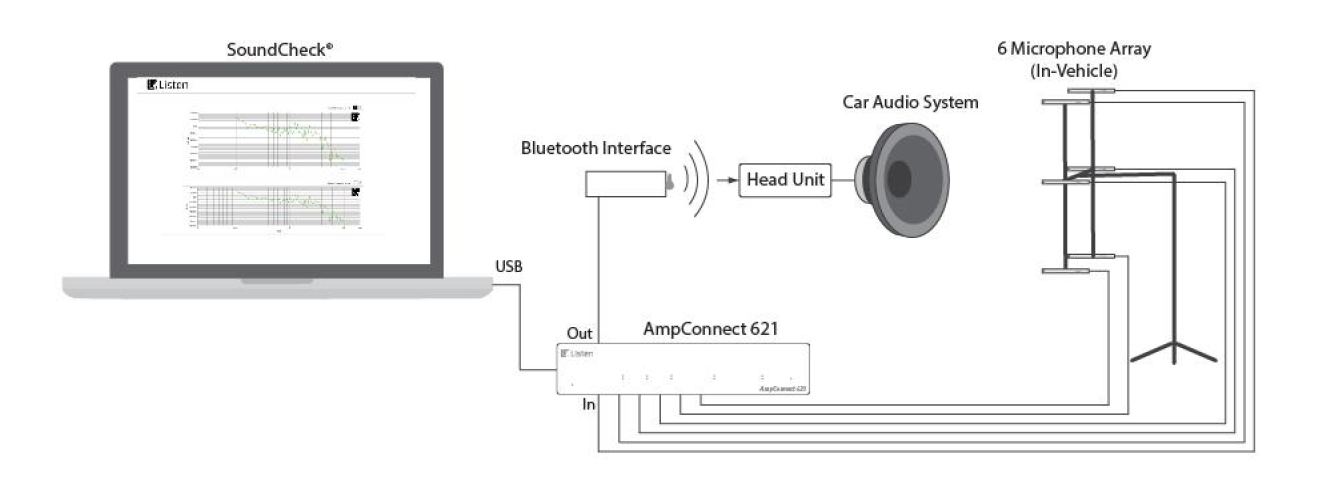
Open Loop System Diagram

Further sequence development
Ways in which you could modify or further develop the sequence include:
- Frequency response measurements can be performed at different levels to better characterize the infotainment system.
- Additional distortion metrics could be added to sequences
Get In-Car Audio Measurements Sequence
Download Sequence (zip file)
Download Sequence documentation (PDF)
Learn more about connecting to car audio.


